 Iljoong's Blog
Accessing Azure Sevice Management REST API
시작
Azure 플랫폼은 Azure 내의 다양한 리소스를 외부에서 접근할 수 있게 다양한 REST API 앤드포인트를 제공하고 있습니다.
Azure의 리소스를 포탈이 아닌 백앤드 서비스에서 생성/삭제/멈춤/시작과 같은 제어가 필요하다면 Azure Service Management REST API를 이용할 수 있습니다. 예를 들어, 사용하고 있지 않은 VM을 deallocate하고자 한다면 아래의 REST API(ARM)를 호출할 수 있습니다.
POST, https://management.azure.com/subscriptions/{subscription}/resourceGroups/{resourceGroupName}/providers/Microsoft.Compute/virtualMachines/{virtual machinename}/deallocate?api-version={api-version}https://msdn.microsoft.com/en-us/library/azure/mt163686.aspx
당연히, REST API를 호출하기에 앞서 사용자 인증과 Authorization 토큰을 획득하고, Header에 토큰을 추가해서 API를 호출해야만 정상적으로 응답 또는 실행이 됩니다.
이번에는 Service Management REST API를 사용하기 위해서 Authorization 토큰을 획득하는 방법에 대해서 소개하겠습니다. OAuth 2.0 기반의 Bearer Token으로 동작하기 때문에 OAuth 2.0에 대한 소개를 먼저 간략하게 소개하도록 하겠습니다.
OAuth 2.0
한글 위키피디아를 인용하면, “OAuth는 OpenID로 개발된 표준 인증 방식으로, 각종 애플리케이션에서 사용자 인증을 거칠때 활용될 수 있다.”라고 설명하고 있습니다. 즉, OAuth는 Google, Facebook, Microsoft 및 Twitter와 같은 여러 인증서비스를 표준화된 방식으로 접근할 수 있게 하는 일종의 표준 규약입니다.
OAuth 2.0에서는 접근이 필요한 리소스에 대해서 사용권한을 요청하고 인증을 거쳐 Authorization 토큰을 획득합니다. 사용권한을 요청하는 방식은 4가지 방식이 있으며 각 목적에 따라 선택할 수 있습니다. 간단히 3가지 방법에 대해서 설명하면 (3가지만 실제 해봐서…),
-
Client grant: 사용자 인증이 필요 없는 자동화된 백앤드 서비스를 개발할 경우 -
Code grant: 사용자 인증을 필요하고, 서버 사이드 웹앱을 개발할 경우 -
Implicit grant: 사용자 인증이 필요하고, 클라이언트 사이드 또는 SPA (Single Page Application) 웹앱을 개발할 경우
좀더 상세한 내용은 다음의 URL을 참조하세요. http://alexbilbie.com/guide-to-oauth-2-grants/

Azure AD 설정 및 리소스의 권한 추가
Azure에서는 Azure AD를 통해 사용권한을 요청하고 인증을 수행합니다. 참고로 Azure AD는 Microsoft의 Identity and Access Management 서비스로 사용자 인증/권한을 관리하며 OAuth 이외의 다양한 인증 방법을 지원합니다. Azure 리소스를 접근하는 웹 또는 클라이언트 애플리케이션에 매핑되는 신규 애플리케이션을 생성하고 OAuth에서 요구하는 설정을 수행해야 합니다.
아래는 OAuth 인증을 수행하기 위해서 Azure AD에서 신규 생성한 애플리케이션의 구성 정보 화면 입니다.
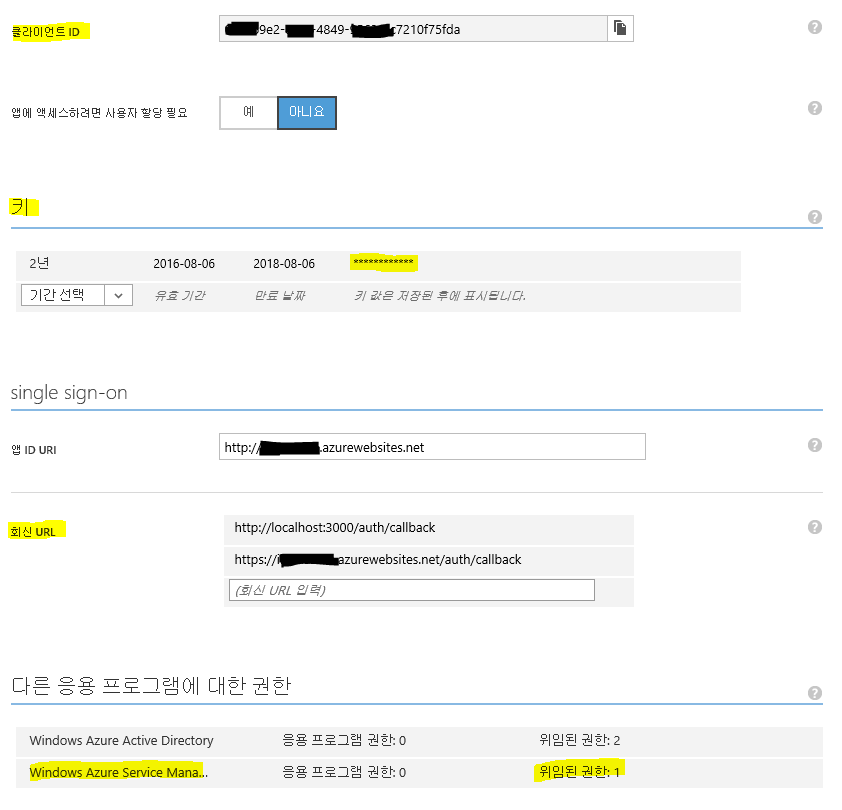
OAuth Grant 방식에 따라 약간의 차이가 있지만, OAuth 인증을 위해 필요한 정보는 아래의 Azure AD의 애플리케이션 구성 정보에서 바로 확인이 가능합니다.
tenant id: 기본 화면에서는 확인이 불가능하고, 포탈의 하단 툴바의 끝점 보기에서 확인이 가능client id: 클라이언트 IDclient secret: 키 설정에서 키를 추가하고 저장하면 확인할 수 있음. 이후 *로 표시되므로 키 값은 따로 주의해서 보관 필요redirect url: 회신 URL에서 추가 가능하며 1개 이상의 URL 등록 가능resource: 응용 프로그램 추가로 리소스를 추가할 수 있으며 기본적으로 ‘Windows Azure Active Directory’가 추가되어 있음. REST API를 위해서 ‘Windows Azure Service Management’를 추가 해야하며resource값은https://management.core.windows.net/임
자세한 설정 방법은 다음을 참고하세요.
위 문서의 설정은 client grant (또는 service principal)방식 예 입니다.
Code 및 Implicit grant 방식을 사용하고자 할 때는 해당 Azure AD Tenant에 사용자가 등록되어 있어야 합니다.
주의 할 부분은 Implicit grant를 사용할 경우, 기본적으로 비활성화 되어 있기 때문에 Azure AD에서 수작업으로 활성화 설정을 해야 합니다. 자세한 내용은 다음을 참고하세요.
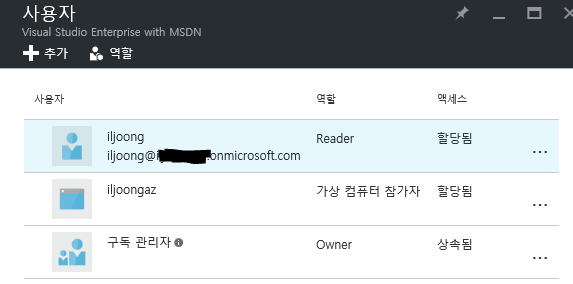
마지막으로, Azure AD 는 권한에 대한 대행을 해주기 때문에 사용자 또는 Azure AD 애플리케이션(Client grant방식)을 Azure 매니지먼트 리소스에 해당 권한(구독의 Reader 또는 특정 리소스의 참가자)에 추가해야만 리소스를 정상적으로 접근할 수 있습니다.
샘플 설명
3가지 OAuth Grant 방식의 샘플은 Github를 참조하시기 바랍니다. OAuth 2.0 동작 매커니즘을 이해할 수 있도록 SDK/Library는 사용하지 않고 node.js/JQuery로 순수하게 구현하였습니다.
http://github.com/iljoong/accessazure
모든 샘플 코드에서 사용되는 client_id와 같은 인증에 필요한 정보는 별도의 _config.js 파일에서 업데이트해야 합니다.
1. Client Grant
Client grant 방식은 사용자의 인증 없이 client_secret 키를 통해서 인증되고 Authorization 토큰을 획득합니다.
1
2
3
4
5
6
7
8
9
10
11
12
13
14
15
16
17
18
19
20
21
22
23
24
25
function getToken(func) {

  var config = {
      uri: 'https://login.microsoftonline.com/' + _config.tenant_id + '/oauth2/token',
      method: 'POST',
      headers: {
            'Content-Type': 'application/x-www-form-urlencoded',
        },
      form: {
          grant_type: 'client_credentials',
          resource: 'https://management.core.windows.net/',
          client_id: _config.client_id,
          client_secret: _config.client_secret

      }
    };

  request(config, function(err, resp, body) {
    if (err) {
      console.log(err);
    }  else {
        func( body );
    }
  });
}
토큰을 획득하면, REST API (VM list)를 아래와 같이 호출합니다.
1
2
3
4
5
6
7
8
9
10
11
12
13
14
15
16
17
18
19
20
21
22
23
24
25
26
27
function getVMList(token) {
    if (!token) {
        console.log('NO access_token');
        return;
    }

    var config = {
        uri: 'https://management.azure.com/subscriptions/' + _config.subscription + '/providers/Microsoft.Compute/virtualMachines?api-version=2016-03-30',
        method: 'GET',
        headers: {
            'Authorization': 'Bearer ' + token,
            'Content-Type': 'application/json;charset=utf-8'
        }
    };

    request(config, function (err, resp, body) {
        if (err) {
            console.log(err);
        }
        else {
            console.log('\n##VM List\n');
            console.log(body);
            console.log('\n\niljoong@outlook.com')
        }

    });
}
2. Code Grant
Client grant와 달리 사용자 인증(로그인)을 거쳐 인증된 code를 가지고 리소스에 대한 접근 토큰을 획득합니다. 인증된 Code는 redirect_uri로 지정된 경로로 전달되며 이 Code로 권한을 요청하여 Authorization 토큰을 획득합니다. 참고로 Authorization 토큰은 1시간만 유효하므로 시간이 경과된 후에는 재인증이 필요합니다. 재인증을 위해서 재로그인을 하는 것이 아니라 refresh 토큰으로 Authorization 토큰을 재획득할 수 있습니다.
1
2
3
4
5
6
7
8
9
10
11
12
13
14
15
16
17
18
19
20
21
22
23
24
25
26
27
28
29
30
31
32
33
34
35
36
37
38
39
40
41
42
43
44
45
46
47
48
49
50
51
52
53
54
55
56
57
58
59
60
61
62
63
64
router.get('/login', function(req, res, next) {

  var config = {
      uri: 'https://login.windows.net/' + _config.tenant_id + '/oauth2/authorize',
      method: 'GET',
      headers: {
            'Content-Type': 'application/x-www-form-urlencoded',
        },
      form: {
        response_type: 'code',
        client_id: _config.client_id,
        redirect_uri: _config.redirect_uri,
        //response_mode: 'query',
        resource: 'https://management.core.windows.net/'
      }
    };

  request(config, function (err, response, body) {

      if (err) {
          console.log(err);
      } else {
          console.log("body:", response.body);

          res.send(response.body);

      }
  });

});

router.get('/auth/callback', function(req, res, next) {

  var config = {
      uri: 'https://login.windows.net/' + _config.tenant_id + '/oauth2/token',
      method: 'POST',
      headers: {
            'Content-Type': 'application/x-www-form-urlencoded',
        },
      form: {
        grant_type: 'authorization_code',
        client_id: _config.client_id,
        redirect_uri: _config.redirect_uri,
        code: req.query.code,
        resource: 'https://management.core.windows.net/',
        client_secret: _config.client_secret
      }
    };

  request(config, function (err, response, body) {

      if (err) {
          console.log(err);
      } else {
          var body = JSON.parse(response.body);
          res.cookie('token', body.access_token, {  maxAge: 900000 });
          res.cookie('refresh_token', body.refresh_token, {  maxAge: 900000 });

          res.redirect('/');

      }
  });

});
토큰을 획득하면, Cookie (또는 웹 세션)에 저장하고 /azure 경로에서 REST API (VM list)를 호출할 때 Cookie에서 토큰을 읽어 아래와 같이 호출하여 표시 합니다.
1
2
3
4
5
6
7
8
9
10
11
12
13
14
15
16
17
18
19
20
21
22
23
24
25
26
27
28
29
30
31
32
33
34
35
router.get('/azure', function(req, res, next) {

    var token = req.cookies.token;
    var retoken = req.cookies.refresh_token;

    getVMlist(token, function(err, resp, body) {
        if (err) {
            console.log(err);
            res.render('error', {error: err});
        }
        else {
            res.render('vmlist', {title: "VM List", token: token, retoken: retoken, body: body})
        }
    });
});

function getVMlist(token, func)
{
    if (!token)
    {
        console.log('NO access_token');
        return;
    }

    var config = {
        uri: 'https://management.azure.com/subscriptions/'+ _config.subscription + '/providers/Microsoft.Compute/virtualmachines?api-version=2016-03-30',
        method: 'GET',
        headers: {
            'Authorization': 'Bearer ' + token,
            'Content-Type': 'application/json;charset=utf-8'
        }
    };

    request(config, func);
}
3. Implicit Grant
Angularjs와 같은 SPA(Single Page Application) 방식의 개발이 최근 선호되고 있습니다. 코드 또는 스크립트가 서버사이드가 아닌 클라이언트에서 인증이 동작되기 때문에 Code grant와 같은 방식은 보안적으로 문제가 있습니다. 즉, client_secret 키가 브라우저를 통해 손쉽게 노출이 된다는 것 입니다. 이를 보완한 방식이 Implicit grant라고 보시면 됩니다.
1
2
3
4
5
6
7
8
9
10
11
12
<body>
    <script>
var _url = 'https://login.windows.net/' + _tenant_id + '/oauth2/authorize?response_type=token&resource=' + encodeURIComponent(_resource)
            + '&client_id=' + _client_id
            + '&redirect_uri=' + encodeURIComponent(_redirect_uri);

$('#url').attr("href", _url);
</script>

<p>Please login</p>
    <a href="" id='url'>Login</a>
</body>
로그인을 통해 사용자가 인증되면, Authorization 토큰은 redirect_uri로 지정된 경로의 hash string (예: /auth/callback/#access_token=eyJ0eXAiOiJKV1QiLCJhbGciOiJSUzI1NiIsIng)으로 전달됩니다. Query string이 아니기 때문에 서버사이드에서 파싱을 하지 못하며, 클라이언트 스크립트에서 토큰을 파싱해서 사용해야 합니다.
참고로, Implicit grant 방식에서는 refresh_token이 생성되지 않습니다.
1
2
3
4
5
6
7
8
9
10
11
$(document).ready(function(){
          var url = window.location.hash;

          access_token = url.match(/\#(?:access_token)\=([\S\s]*?)\&/)[1];
          console.log(access_token);

          // set 1 hour expire - js.cookie.js was modified to set hourly expire
          Cookies.set('token', access_token, { expires: 1 });

          location.replace('/');
      });
Code grant와 유사하게 획득한 토큰은 Cookie에 저장하고 이후 REST API를 호출할 때 Cookie에서 읽어 호출합니다.
1
2
3
4
5
6
7
8
9
10
11
12
13
14
15
16
17
18
19
20
21
22
23
24
25
26
27
28
29
30
31
32
33
$(document).ready(function(){

          var access_token = Cookies.get('token');

          if (access_token == null ) {
             ...

} else {

	  ...
            var _url = 'https://management.azure.com/subscriptions/'+ _subscription  + '/providers/Microsoft.Compute/virtualmachines?api-version=2016-03-30';

            var _headers = {
                'Authorization': 'Bearer ' + access_token,
                'Content-Type': 'application/json;charset=utf-8'
                };

            $.ajax({
                url: _url,
                type: 'GET',
                dataType: 'json',
                headers: _headers,
                success: function (result) {
                    var html = JSON.stringify( result, null, 4 );
                    $('#vmlist').html( html );
                },
                error: function (error) {
                    $('#vmlist').html( 'Error' );
                }

            });
          }
      });
맺으면서
본 샘플에서는 VM의 목록만 가져오는 예만 구현하였지만, VM을 stop/deallocate 또는 start와 같은 Azure 리소스의 다양한 백앤드 연동을 손쉽게 구현할 수 있습니다.
OAuth 인증/권한 설정 및 구현 과정이 좀 복잡하여 작은 실수로 오류가 손쉽게 날 수 있어 주의하시기 바랍니다. 예를 들어, redirect_uri를 누락 또는 잘못 지정하면 (https://domain.com/callback 과 https://domain.com/callback/ 은 / 하나 차이로 다르게 인식) 오류가 발생합니다.
레퍼런스
/iljoong/